It’s not unusual that a given algorithm requires values or positions to be sampled from a geometric mesh – some of the projects described in past entries of this blog are examples of it: the Weathering Simulation and Space Colonization Algorithm required points to be placed on the surface of a mesh, wereas the Voronoi Shattering seeds the fragments with positions obtained along the volume of a source object.
In this post I’ll be providing more detail on the implementation of those two kinds of samplers, and at the end of the post you can find the link to some source code which should hopefully help complementing the description.
Sampling the surface of a mesh
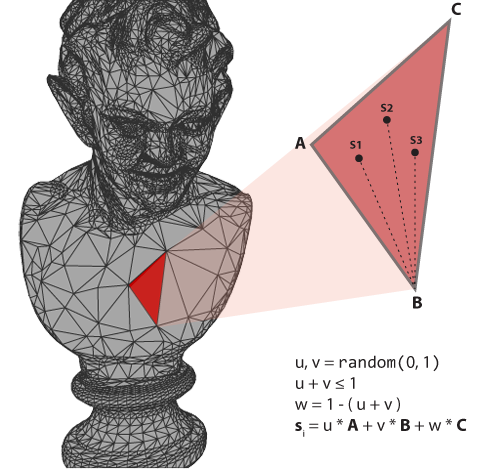
Placing random samples along the triangles of a polygonal mesh is the easiest case. The process consists in simply chosing a random triangle, and then generate a point within its bounds until we’ve reached a desired number of samples.
Sampling a triangle can be done using barycentric coordinates as depicted in Figure 1. We start with two variables u and v with random values between 0 and 1 such that u + v ≤ 1 (for this we can keep generating values until the condition is met, or even quicker, just pick the complementary value u = 1 – u, v = 1 – v when u + v > 1). The resulting point is given by the weighed sum of the triangle vertices such as:
s = u*A + v*B + w*C = u*A + v*B + (1 - (u+v)) * C
In order to guarantee a more uniform coverage of the samples, it’s better to weight the probability for a triangle to be sampled according to its area, so that larger triangles will be sampled more often and hold more samples along their surface. We can use the cumulative distribution to pick elements from the triangle array with the following simple steps:
1. Calculate the area of every triangle and store it into an array.
E.g. [ 0.1, 0.4, 0.5, 0.2 ]
2. Find the smaller value on the array and divide every element by it, rounding to the next integer. The array is now holding how proportionally larger each triangle is compared to the smallest one.
ceil( [ 0.1, 0.4, 0.5, 0.2 ] / 0.1) = [ 1, 4, 5, 2 ]
3. Add up the elements of the array and initialize a second array of that length, so that the index i of a triangle is repeated as many times as it’s corresponding values on the first array:
A1: [ 1, 4, 5, 2 ]
A2: [ 0, 1, 1, 1, 1, 2, 2, 2, 2, 2, 3, 3 ]
4. All that’s left is picking a random element within A2, t = A2[ random(0,1) * length(A2) ] as our triangle index.
Sampling the volume of a mesh
Things get a bit more involved when we want to place samples not just on the surface but also in the volume enclosed by the object. I’ve personally been using a couple of alternatives with different pros and cons that I found useful, an implementation as maya nodes can be found in the provided source code 🙂
Using ray intersections
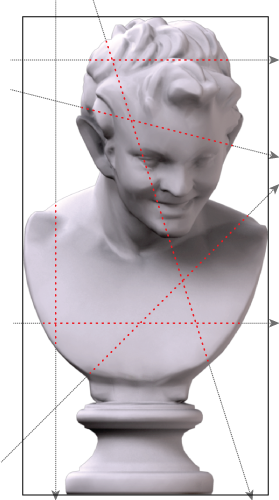
A very straightforward way of sampling a volume is the one illustrated in Figure 2: we begin by obtaining the bounds of the mesh and then iterativelly shoot rays joining two random points on opposite faces.
Assuming the mesh is closed, each ray will intersect the geometry in a number of segments (red dashed lines) each defined by an entry and an exit point. We’ll generate samples for each segment, putting care in trying to preserve an overall sampling density #samples on segment = length segment * density, which in the implementation is defined as a “linear density factor” obtained from the bounding box volume and the number of samples requested. Rinse and repeat until we have enough samples.
The pros of this approach is that it fits the shape perfectly since we can precisely obtain the entry and exit points for each ray. Maya provides built-in facilities for retrieving all the intersections on the MFnMesh class by using an internal grid acceleration structure (which is fair enough for moderate meshes). The downsides of this technique are that it may be a bit slow, depending on our requirements, and that the distribution is far from ideal for few samples – although it tends to converge decently when the number of requested samples increases. I found it useful to limit the number of samples a given segment can contribute with to enforce the algorithm shooting more rays and therefore increasing the density of segments instead of the number of samples along each segment.
Sampling voxels
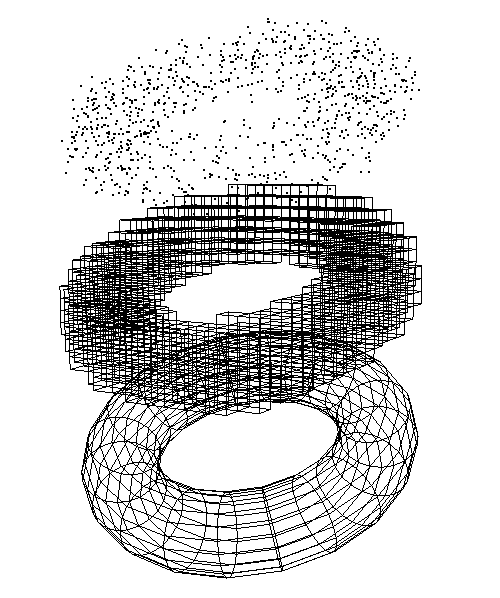
A different approach to sample volumes is to first voxelize the source geometry and then obtain the samples as random points within the voxels. If our voxels are the same size, we just need to pick a random voxel and a random point within that voxel and repeat. If the voxels have different sizes though, we can use the same cumulative distribution concept described above and sample according their volume for a more uniform coverage.
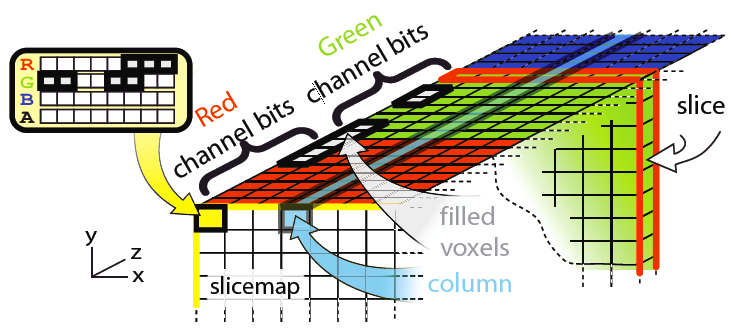
There are several ways of generating voxels from a mesh (Fig. 3), but it can be done particularly efficiently by using the GPU: the idea is to rasterize the object in a fairly low-res image, and use the pixels of those image as a grid to tell which cells are occupied. This can be done in a multi-pass algorithm by playing with the camera clip planes to “peel” the object into slices rendered to texture. Alternatively, we can do it in a single pass as described in [Eisemann 08] by encoding the depth information in the bits of the color components of each pixel.
The idea is simple but powerful: let’s assume we’re using a render target using 32 bits 8+8+8+8 RGBA channels. For each pixel on the texture, we can set treat the color bits as cells in depth, and then set each one of the 32 different bits to 1 if there is a filled voxel occupying the corresponding cell. We do this by first disabling the depth mask, so no fragments are culled, and rendering the object once from an orthographic projection fitted around the bounding box. For each fragment rendered, we find it’s corresponding bit corresponding to it’s normalized depth in the bounding box, and output a bitmask which is combined in the resulting texture using OpenGL’s bit operator blend mode.
To generate the voxels from the image, we check the value for every pixel, and instead of treating it as color, we treat it as a bit array and output a voxel for each active bit. Even better, by just changing the bitmasks used on each fragment, you can trivially change the behavior of the algorithm from volume to surface sampling 🙂
The main benefit of this technique by far is speed: you can voxelize complex objects in real time, and generate the samples from those voxels is cheap as well. On the other hand the number of voxels is limited by the bit depth used in the target texture. With 32 bits per component you can go up to 128 voxels in depth (this is how the provided implementation works), and to go beyond those numbers we’d have to make use of a multipass algorithm as described above. Another drawback is lack of precission: since the voxels won’t match the surface of the object perfectly, the samples we obtain from them may potentially be slithgly outside the original mesh. The problem is of course minimized as we increase the resolution of the voxelization.
Quality of random numbers
Just to make a quick note about this – we’ve been using random uniform variables in these methods to pick elements, or sample points within a triangle or a voxel. A straightforward way of doing this is to use the default rand method in C. For the sake of clarity that’s the method provided in the implementation, but one must be aware that the quality of these pseudo-random number sequences is generally very poor. Even with a better random number generator you may find that chosing points randomly along a surface tends to form clusters and gaps. If that’s the case, better sampling methods can be used instead to generate sequences of values and improve the distribution. I find the illustrations on this paper particularly clear to understand the differences visually.
Downloads
Precompiled plugins for Maya 2011 32 and 64 bit under Windows: sampler.zip
Source code available on GitHub: https://github.com/joesfer/Sampler
The plugin also includes auxiliary preview nodes to help visualizing the samples and the voxels. Since I thought the voxelizer may be useful for purposes other than sampling (or just because producing Lego versions of meshes is fun!) it is encapsulated it in it’s own node for easy reuse.
References
Stack Overflow. Picking a random number based on probabilities.
[Eisemann 08] Elmar Eisemann, Xavier D´ecoret. “Single-Pass GPU Solid Voxelization for Real-Time Applications”. GI ’08: Proceedings of Graphics Interface 2008 322 (2008) 73-80.


Look at that, I am deeply in the need for such.
Might there be a maya 2015 plugin available?
Regards
Michiel