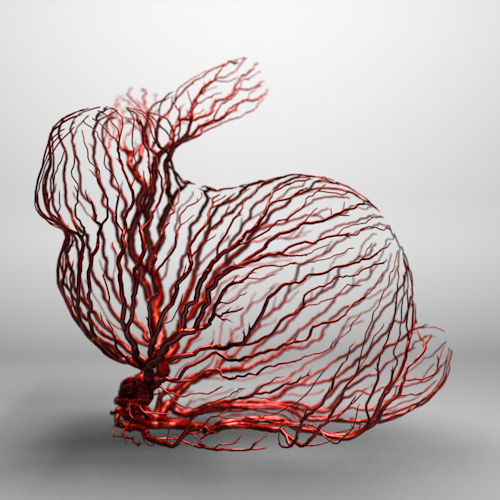
This project arose from a conversation with my friend Gino, who is currently working on Medical Visualization, about the difficulty for an artist to create growing structures such as veins -let alone animate them- and how to make them look organic, and therefore irregular and adapted to the surrounding they grow upon.
The Problem
I decided to tackle the problem, and the first approach that came to my mind were L-Systems, which have proven useful for modelling vegetation. There are two restrictions, however, which discouraged me from taking this approach:
- We should be able to bind the growing of the structures to a surface, and therefore the growth needs to be context aware.
- We need to be able to direct the growth by specifying the areas the structure is allowed to occupy.
Doing some research I ended up taking the approach described in the paper Modeling trees with a space colonization algorithm, listed in Algorithmic Botany, which perfectly suits the aforementioned requirements.
Space Colonization Algorithm
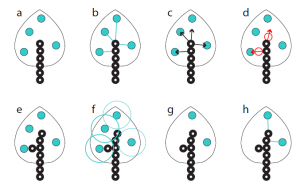
The idea for the Space Colonization Algorithm is brilliantly simple: instead of generating the nodes that build our structure by using a set of rules (e.g. a grammar), we begin by producing a set of attractor points by sampling a domain -the surface of an object in our case-. Then we provide one or several start locations, and we iteratively start adding nodes by looking for the set of nearest active attractors, and growing towards them. When a new node is added, it kills all the attractor points which fall within a specified range, preventing other branches to fill in the same space, and directing the growth forward.
Implementation in Maya
Given the stages of the SCA algorithm, the natural solution felt to devise them as a set of separate DAG nodes which will be linked together. This allows Maya to cache the result of each individual stage and update the graph efficiently when a given parameter is tweaked without requiring the whole solution to be re-evaluated.
- The Sampler node: takes a mesh as the input and produces a number of attractor points by sampling it. The more points we generate, the better the growing structure will fit upon the surface, but that will also tend to generate denser heavier structures.
- The Grower node: implements the SCA algorithm. It is fed with the set of attractor points, which are stored in a kd-tree for efficient nearest neighbor queries. An input locator provides the start position for the growth, and the exposed parameters of the algorithm control how the attractors are consumed to produce the resulting structure:
- Search Radius: specifies what’s the maximum distance an attractor point can influence over a node. It is given in % of the mesh bounding box extents. A high value will link distant areas, allowing the structure to “jump” between them.
- Kill Radius: The range within an attractor point will be killed if it is near a grower node. Large kill radius result in smoother branches, whereas lower values will generate curlier shapes.
- Grow Distance: the distance between nodes, the lower the value, the denser the resulting geometry.
- Max Neighbors: for the nearest neighbor searches – controls how many attractor points affect a given node at a time. Large values will smooth out the branches, and a low number of neighbors on the other hand will produce noisier more organic lines (up to a limit).
- The Trimmer node: provides a Percent Length parameter which can be used to animate the growth of the structure generated.
- The GrowerShape node: takes the (trimmed) result of the SCA and generates a polygonal mesh. It exposes a Tube Sections, and Thickness parameters, which control the smoothness and size of the branches.
The node hierarchy can be easily built with the provided command “grow” -Â Just select a mesh and an optional a locator node, and type grow on the MEL console.
Directing the growth
The sampler node allows restricting which faces are used to generate the attractor points. To do so, it uses a vertex color set associated with the input mesh: the lightness of the vertex colors is used to determine the probability for each face to be sampled, hence, black faces will be excluded from sampling. See the example video below.
Download
If you feel like trying it out, I have compiled a version of the plugin for Maya 2011 32 and 64-bit. You can find it here.
Edit: I’ve also added new precompiled binaries for Maya 2015 64 bit (Windows).
Also, the source code is hosted under github


I’m new to programming and trying to simulate tree growth is what inspired me to learn in the first place. Having this code to draw inspiration from will no doubt help me greatly!
Thanks for sharing!
This is extremely cool! Is it possible to fill a volume with 3D branching structures like this, not just have them skin the surface of an object?
Please forgive me if this is an obvious or dumb question but I am just starting out in Maya and do not know my way around well yet at all
It is a modular system – the growing algorithm works by connecting seed points so it doesn’t make a difference between 2D or 3D. One would need to plug it to a sampling algorithm/mode which scatters points inside of the mesh volume however. The sampler shipped with this grower plugin only works on the triangles surfaces, but it could be extended to volumes.
This is awesome! But it seems like the current grower is incompatible with the Maya 2016, is that anyway to use it in Maya 2016?
Should be easy to recompile it for a new Maya version from the source code available
Thanks for your reply, im very new to maya scripting, is that possible for u to release a 2016 version?