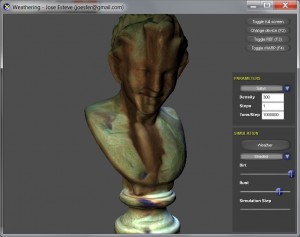
Here is a project I’ve been working on lately: a surface weathering simulation prototype.
Surface weathering is usually a type of texture synthesis which aims to simulate the degradation of an object due to external agents -weather-. The textures are therefore tailor-made for the specific object the simulation is run upon, depending on its topology. Despite the results are seldom good enough on their own (it’s an automatic process after all), they are a good start for some further hand-tuning.
The simulation method I have implemented is based on the paper called Visual Simulation of Weathering By γ-ton Tracing which follows a process consisting on tracing particles carrying stuff against the model, and simulate their interaction with the surface. The actual weathering simulation depends on what the particles carry – in my case I was interested on simulating dirt and rust over a metallic surface, but different kinds of degrading processes can be parametrized with this method, depending on the settings.
Conceptually the simulation slightly resembles the photon mapping algorithm, but instead of carrying light, we’re carrying dirt, rust, humidity, and so on…
The implementation goes as follows:
- First we sample the polygonal mesh according to a density, producing a set of points or surfels and storing them in a kd-tree. These surfels will hold the current material properties at each point. For the sampling I’ve opted for shooting rays from each one of the faces of the object’s bounding box, pointing inwards, evenly distributing their positions via a Halton sequence. This is a simple method which works well for the kind of models we’re using here, but it would have problems with overlapping surfaces. More sophisticated sampling methods could be used if need be.
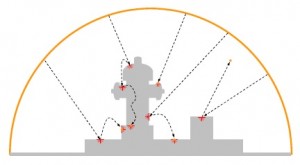
- Next we start tracing gamma-tons from the hemisphere surrounding the object towards the center of it. Each particle carries an initial set of values describing the dirt and humidity. We use raytracing to determine the hit point of the particle against the polygonal surface, this process is carried out in parallel.
- For each particle hit, we stochastically decide whether to bounce the particle off, make it flow over the surface, or settle it down. These movements may lead to subsequent traces, which are stacked into the task list. When a particle interacts with the surface, there is a transfer of substances between the nearest surfels and the particle; for instance, the particle may deposit or remove dirt, and will humidify the surface along its path, which will eventually lead to rust.
- After all the particle tracing has finished, we plot the resulting contents of the surfels into several textures, creating masks which are fed into a HLSL shader rendering the aged metal. Note that this stage relies on having good texture coordinates for the object, which can be sometimes tricky. For the model displayed here I used the XRay unwrap plugin for 3dsmax, which works pretty nicely.
- The beauty of this method is that we can perform these steps iterativelly, accumulating the results on each pass. This allows us to generate a sequence of steps depicting the different stages the simulation goes by. I have attached a video below showing 10 steps of a simulation.
You can find the application here (requires Windows Vista or newer and DirectX. Does not include the Satyr model.)Â you can also see how it works in the following videos:


